How-to · Knives
How to Sharpen a Kitchen Knife With a Whetstone

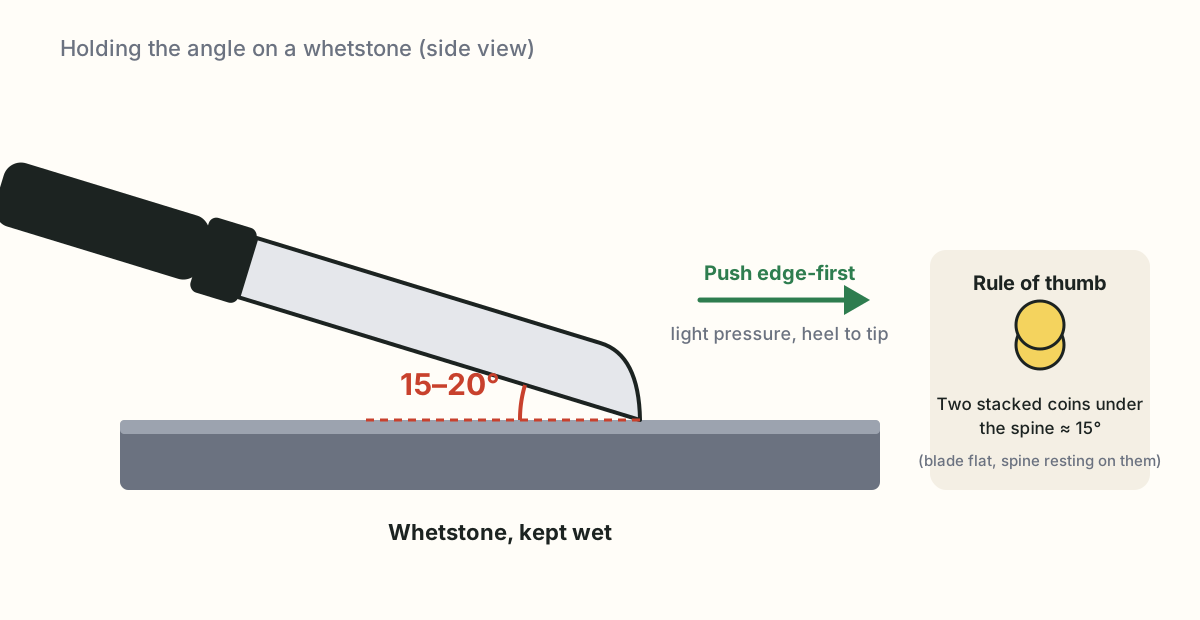
Short answer: Soak the stone, hold the knife at about 15 to 20 degrees, push it edge-first across the coarse side until you feel a burr along the whole edge, flip the knife and do the same on the other side, repeat on the fine side with lighter strokes, then strip the burr with a few very light alternating strokes.
You need: a whetstone (a 1000/3000 or 1000/6000 combination stone is ideal), a bowl of water, a damp towel to hold the stone still, and a knife. Time: 15 to 20 minutes for a dull knife the first time; faster once you have done it twice.
Sharpening on a stone is the cheapest way to get a sharp knife and the only method that keeps your knives healthy for years. It looks harder than it is. The whole skill is holding one angle and repeating one motion.
Before you start: which stone and which grit
Whetstones are graded by grit: the lower the number, the coarser the stone and the more steel it removes per stroke.
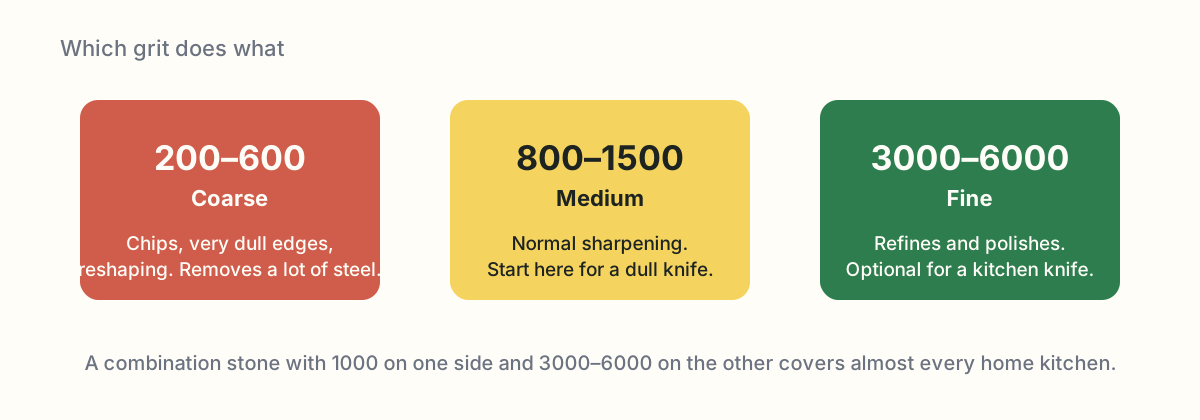
| Grit | Use it for |
|---|---|
| 200 to 600 (coarse) | Chips, very dull edges, changing the angle. Removes a lot of metal; most knives rarely need it. |
| 800 to 1500 (medium) | The everyday sharpening grit. Start here. |
| 3000 to 6000 (fine) | Refining the edge after the medium side. Makes it smoother and longer lasting. |
For a home kitchen, a combination stone with a medium side and a fine side covers everything. A separate coarse stone is only worth buying if your knives have chips.
Step 1: Soak the stone
Most budget whetstones are water stones that need to be soaked. Put the stone in water for 10 to 15 minutes, until bubbles stop rising from it. A dry stone clogs with steel dust and loads up with the knife’s metal, which makes it cut slowly.
Some stones are splash-and-go (just wet the surface) and some are oil stones (use mineral oil, never water). Check the packaging; if it says nothing, soak it.
Step 2: Set up a stable base
Put a damp towel on the counter and the stone on the towel, coarse side up. The stone must not slide. If it moves while you sharpen, you lose the angle and risk the blade. Many stones come with a rubber base, which does the same job.
Keep the bowl of water next to you. Splash the stone whenever it starts to look dry during sharpening.
Step 3: Find the angle
Hold the knife in your dominant hand, with your thumb on the spine and index finger on the flat of the blade near the heel. Lay the blade flat on the stone, then tilt it up until the edge touches the stone at about 15 to 20 degrees.
An easy reference: with the blade flat on the stone, two stacked coins under the spine of a chef’s knife is close to 15 degrees. Raise it a touch for a thicker Western knife.
Which angle is right?
- Western chef’s knives (German style, thick blades): around 20 degrees per side.
- Japanese knives (thinner, harder steel): around 15 degrees per side.
- Not sure: 17 degrees. A knife sharpened a few degrees off its factory angle still cuts well; a knife sharpened at a wobbling angle does not.
Put the fingertips of your other hand on the flat of the blade, over the part touching the stone. They apply the pressure and help you feel if the angle changes.
Step 4: Sharpen the first side
Push the knife edge-first across the stone, from the heel of the blade to the tip, as if you were trying to slice a thin layer off the stone. Use light to moderate pressure on the push stroke, and little or none on the way back.
Because the blade is longer than the stone is wide, sweep the knife across the stone as you push, so that the whole edge, heel to tip, gets stone time. The tip is the part people miss; lift the handle slightly as you reach it, to follow the curve of the blade.
Keep going on this side until you feel a burr along the entire opposite side of the edge. To check, run your thumb from the spine down across the edge (across, never along it). A burr feels like a fine, rough lip of metal that catches your skin. A dull knife can take 30 to 60 strokes per side on a medium stone; keep going until the burr runs from heel to tip.
Step 5: Sharpen the second side
Flip the knife, swap hands if that is comfortable, or keep the same hand and pull instead of push. Repeat the same stroke at the same angle, until the burr has moved to the first side of the edge.
Count your strokes on the first side and do roughly the same number on the second, so the edge stays centered.
Step 6: Move to the fine side
Flip the stone to the fine side (or move to your fine stone), wet it, and repeat Steps 4 and 5 with about half the strokes and lighter pressure. You are no longer removing much steel; you are smoothing the scratches left by the coarse side. The burr will get smaller and finer.
Step 7: Remove the burr
Finish with a few very light, alternating strokes: one stroke on one side, one on the other, five or six times, with barely any pressure. This breaks off the last of the burr. Some people finish by drawing the edge once, gently, across a wine cork or the edge of a wooden board; that works too.
Step 8: Test the edge
- Paper test. Hold a sheet of printer paper by one corner and slice down through it. A sharp knife slices cleanly from heel to tip. If it catches or tears at one spot, that part of the edge needs more work.
- Tomato test. A sharp knife bites into a tomato skin with its own weight and no sawing.
- Fingernail test. With the knife held still, rest the edge very lightly on a thumbnail at a low angle. A sharp edge bites instead of sliding. Go slowly; this is a feel test, not a push.
If the knife is not sharp yet, the usual reason is that the burr never formed along the whole edge on one side. Go back to the medium side and keep going until it does.
Clean up
Rinse the stone and let it dry fully before storing it; a damp stone in a closed drawer can crack or grow mold. Wash the knife, because the gray slurry on it is steel and stone dust. Over time, water stones wear into a dish shape in the middle. A flattening stone, or a sheet of coarse sandpaper on a flat surface, brings them back to flat.
Common mistakes
- Changing the angle mid-stroke. Lock your wrist; the movement comes from your shoulder and elbow.
- Pressing hard. Pressure does not sharpen faster; it rounds the edge. Light and steady.
- Stopping before the burr forms. The burr is the only proof you have reached the edge.
- Skipping the tip. Lift the handle slightly as you reach it so the curve stays on the stone.
- A dry stone. Keep it wet; the slurry is doing some of the work.
- Sharpening a serrated knife. It needs a different tool.
Keeping the edge between sharpenings
A honing rod (steel) does not sharpen; it straightens an edge that has rolled over in use. A few light strokes per side every week or two will keep a sharpened knife feeling sharp for months. Cut on wood or plastic boards, never glass or stone, and wash knives by hand; the dishwasher knocks the edge against other things and dulls it fast.
FAQ
How often should I sharpen my kitchen knife?
For a home cook, a full sharpening on the stone every two to three months is plenty. In between, a few strokes on a honing rod every week or two keeps the edge straight.
What angle should I sharpen at?
Most Western chef’s knives are ground at about 20 degrees per side; most Japanese knives at about 15 degrees. If you do not know, 17 degrees, or roughly two stacked coins under the spine, works for either.
Do I need to soak the stone?
Depends on the stone. Most inexpensive water stones need 10 to 15 minutes under water until bubbles stop. Splash-and-go stones, usually marked that way, only need a sprinkle. Oil stones use oil and never water. Diamond plates use a little water or nothing.
What is a burr?
A tiny ridge of metal that folds over to the opposite side of the edge when you have ground all the way to the edge. Feeling it along the whole length is how you know that side is done.
Can I sharpen serrated or ceramic knives on a whetstone?
Not well. Serrated knives need a rod that fits the scallops, and ceramic knives need a diamond sharpener. A whetstone is for plain-edged steel knives.
Is a pull-through sharpener good enough?
It will make a dull knife cut again, which is better than nothing. But it scrapes off a lot of steel, leaves a rough edge, and can chip thin Japanese blades. A whetstone takes longer to learn and gives a far better, longer-lasting edge.