How-to · Coffee
How to Use a Moka Pot: Stovetop Espresso Without the Bitterness

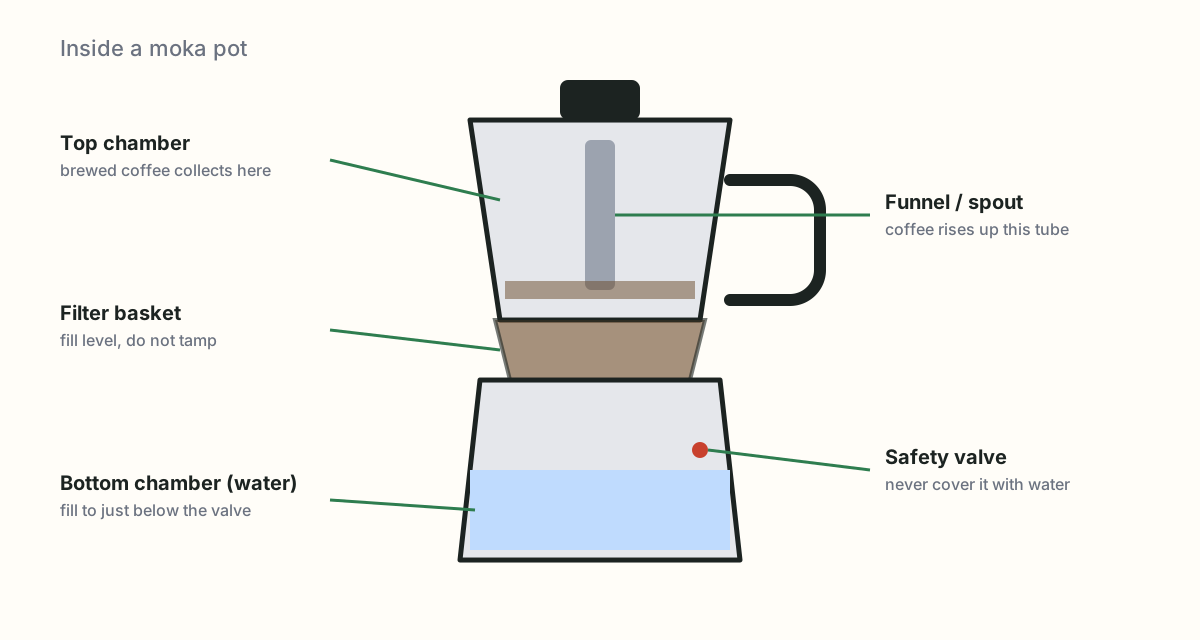
Short answer: Fill the bottom chamber with hot water to just below the valve, fill the basket with medium-fine coffee without pressing it down, screw the pot together with a towel, put it on medium-low heat with the lid open, and take it off the stove the moment the stream turns pale and starts to gurgle. Run the base under cold water to stop the brew. That last step is what separates good moka coffee from burnt moka coffee.
A moka pot is the cheapest way to make strong coffee for milk drinks, and it lasts for decades. The reason so many people think it makes bitter coffee is that the usual instructions (cold water, high heat, let it finish) are wrong.
How it works
Water in the bottom chamber heats, builds a little steam pressure, and is pushed up through the coffee in the basket and out into the top chamber. The pressure is low, around one to two bar, which is why moka coffee is strong but not espresso. The problem is heat: the longer the pot sits on the burner, the hotter the water passing through the coffee gets, and hot water at the end of the brew is what tastes burnt.
Every trick below is about keeping the water temperature under control.
What you need
- A moka pot (3-cup makes about one mug; 6-cup makes two).
- Coffee ground medium-fine. Pre-ground “espresso” grind from a bag is fine.
- A kettle for hot water.
- A towel to hold the hot base.
Step 1: Start with hot water
Boil water in a kettle and fill the bottom chamber to just below the safety valve. Never above it; the valve must stay clear.
Starting with hot water means the pot reaches brewing pressure in a minute or two instead of five, so the coffee grounds spend much less time sitting on a hot metal basket. This is the single biggest improvement you can make.
Step 2: Fill the basket, do not tamp
Put the funnel basket in and fill it with ground coffee, level with the rim, loose. Shake it gently to settle, top up if needed, and brush any grounds off the rim so the seal closes cleanly. Do not press the coffee down.
Step 3: Screw it together
The base is hot, so hold it with the towel while you screw the top on firmly. A loose seal leaks steam and the pot sputters.
Step 4: Medium-low heat, lid open
Put the pot on a burner that is smaller than the base, on medium-low heat. Leave the lid open so you can watch.
After a minute or so, coffee starts to flow into the top chamber in a steady, dark, syrupy stream. That is the good part. It should flow gently; if it spurts and spits, the heat is too high.
Step 5: Take it off early
Watch the stream. When it turns pale yellow and starts to gurgle and hiss, the water is nearly gone and what is coming through now is steam, which is bitter. Take the pot off the heat right then. Do not wait for the gurgling to finish.
To stop the brew completely, run the base under cold tap water for a few seconds or set it on a cold wet cloth. The pressure drops and the extraction stops.
Step 6: Stir and pour
The first coffee into the top is strongest and the last is weakest, so give the top chamber a quick stir before pouring. Drink it straight if you like strong coffee, or use it for a latte, cappuccino or iced coffee; our milk frothing guide covers the milk side.
Common mistakes
- Cold water in the base. Doubles the time on the stove and cooks the grounds.
- High heat. Spurting, sputtering, burnt taste.
- Letting it finish gurgling. The last 20 seconds are steam and bitterness.
- Tamping. Chokes the flow.
- Grind too fine. Same effect as tamping; the pot struggles and sputters.
- Overfilling the water. Covering the safety valve is unsafe and makes weak coffee.
- Washing with soap (aluminum pots). See below.
Cleaning
Let the pot cool, take it apart, and rinse every part with hot water. Dry it fully before reassembling; a damp pot stored closed grows mold in the gasket.
For aluminum pots, most makers advise against dish soap and the dishwasher: soap strips the coffee-oil layer that protects the metal and the pot can taste metallic. Hot water and a soft cloth are enough. Stainless steel pots can be washed with soap.
Every couple of months, check the rubber gasket and the filter plate under it. A hard, cracked gasket leaks and is cheap to replace. If the pot runs slowly, descale the base with a citric acid solution the way you would a coffee maker.
Which size and material
Moka pots are sized in “cups” of about 2 oz (60 ml): a 3-cup makes one normal mug, a 6-cup makes two. They do not work well half-filled, so buy the size you will actually use each morning.
Aluminum is the classic, light, cheap, and heats fast. Stainless steel costs more, works on induction, and can be washed with soap. Both make the same coffee.
FAQ
Is moka pot coffee espresso?
Not quite. A moka pot brews at about 1 to 2 bar of pressure; an espresso machine brews at around 9. Moka coffee is strong and concentrated, closer to espresso than drip, but with less crema and body. It is excellent in milk drinks.
Why does my moka pot coffee taste burnt?
The heat was too high, or the pot stayed on the stove after the gurgling started. Use medium-low heat, start with hot water in the base so the pot spends less time on the burner, and take it off as soon as the stream turns pale and sputters.
What grind for a moka pot?
Medium-fine, a little coarser than espresso and finer than drip. Too fine and the pot struggles, sputters and tastes bitter; too coarse and the coffee is thin. Pre-ground ‘espresso’ coffee usually works.
Should I tamp the coffee in a moka pot?
No. Fill the basket level and loose, and brush off the rim. Tamping raises the pressure the pot needs to push water through and can make it sputter or, in the worst case, vent through the safety valve.
Can I use a moka pot on an induction stove?
Only if the pot is steel or marked induction-compatible. The classic aluminum pots do not work on induction without an adapter plate.