How-to · Knives
How to Hold a Chef's Knife: The Pinch Grip and the Claw

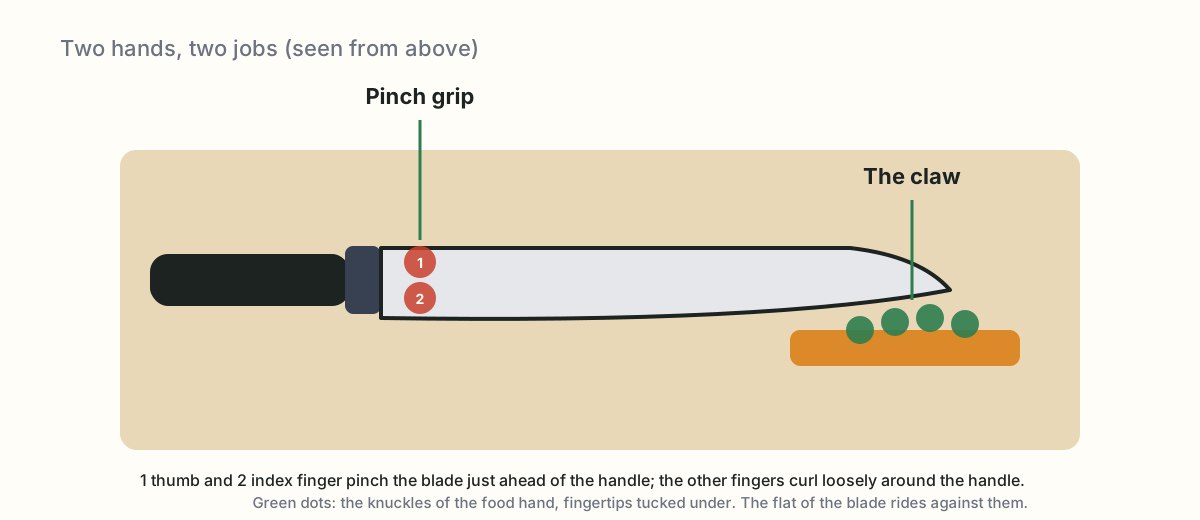
Short answer: Pinch the blade between your thumb and the side of your index finger, just in front of the handle, and wrap the other three fingers loosely around the handle. With your other hand, curl your fingertips under so your knuckles face the blade, and let the flat of the blade rest against those knuckles as a guide. The knife moves; the knuckles set the width of the cut; the fingertips never come out from under.
That is all there is to it. Everything else in knife skills is built on those two hand positions.
The knife hand: the pinch grip
- Hold the knife as if you were going to shake hands with the handle.
- Slide your hand forward until your thumb and the side of your index finger are on the flat of the blade, just ahead of where the handle ends.
- Pinch there, lightly. The other three fingers curl around the handle without squeezing.
Your hand is now at the balance point. The knife will not twist, the tip goes where you point it, and you can cut for an hour without your wrist tiring. Most people who feel clumsy with a knife are holding it by the handle, like a hammer, with the index finger on top of the spine. That grip gives no control and makes the wrist do all the work.
It feels strange for a day or two. Then it is the only way you will want to hold a knife.
The other hand: the claw
Your guiding hand holds the food and protects itself at the same time.
- Put your fingertips on the food and then curl them under, so the first knuckles stick out and the tips are tucked behind them. The thumb tucks back too.
- Rest the flat side of the blade lightly against those knuckles.
- Cut. The blade slides down along the knuckles; it cannot reach the fingertips, because they are behind the knuckles.
- After each cut, walk the claw back a little and the blade follows. The distance you move sets the thickness of the slice.
The blade never rises above the knuckles between cuts. If you lift it higher than that, you lose the guide and the next cut can land anywhere.
The two basic cuts
The rocking cut (chef’s knife). The tip stays on the board. The handle rises and falls, and the curved edge rolls through the food. The knife moves forward slightly with each stroke. This is fast for herbs, garlic and anything you want minced, and comfortable for long sessions.
The push cut (any knife; natural for a santoku). The whole blade lifts a little, then moves forward and down through the food in one motion, landing flat on the board. This gives clean, even slices and suits a flatter blade. Our chef’s knife vs santoku guide explains which knife suits which motion.
In both, the knife does not chop straight down like a guillotine. It slices with a forward or rolling motion. A sharp edge moving forward cuts; a sharp edge pressed straight down crushes.
Setting up the board
A knife skill is only as good as the surface under it. Put a damp towel under the board so it cannot slide, stand with the board at a height where your forearm is about level when the knife is on it, and give yourself room: a board at least 12 by 18 inches (30 by 45 cm) stops food from falling off the edges. Our cutting board guide covers what to buy.
Habits that keep you safe
- A sharp knife. Dull knives slip off food and need force. Force is how people get cut. Keep it sharp.
- Flat side down first. Cut round things (onions, carrots, potatoes) in half, then put the flat side on the board so they cannot roll.
- Eyes on the blade. Look at the cut, not the pile of chopped food.
- Slow is fine. Speed comes from repetition, never from trying to go fast.
- Never catch a falling knife. Step back and let it drop.
- Knife down when you are not cutting. Not in the sink, where a hand reaches in without looking; on the board, edge away from you.
- Carry it point down, by your side, blade facing back.
Practice: the first week
Dice an onion every day for a week, using the pinch and the claw, slowly. By the end of the week the grip is automatic and the dice is even. Our how to dice an onion guide walks through the cuts. Onions are cheap, forgiving, and the single most common thing you will ever cut.
FAQ
Why hold the blade instead of the handle?
Pinching the blade just in front of the handle puts your hand at the knife’s balance point, so the tip does not wander and you steer with the fingers rather than the wrist. It takes a day or two to feel natural and then every other grip feels clumsy.
Is the pinch grip safe?
Safer than a handle grip. Your fingers sit on the flat sides of the blade, well above the edge, and the knife cannot twist in your hand. Nearly all kitchen cuts come from the other hand, which is what the claw protects.
Should the knife tip stay on the board?
For the rocking cut used with a chef’s knife, yes: the tip stays down and the handle rises and falls. For a push cut (used with a santoku or for thin slices) the whole blade lifts a little and moves forward and down.
My hand gets tired. What am I doing wrong?
Usually gripping too hard, or holding the handle instead of pinching. A relaxed pinch with three fingers loosely around the handle takes almost no effort; the knife’s weight and sharpness do the cutting. A dull knife also forces you to grip and press harder.